
Unlock crystal-clear audio for your videos with the Boya BY-M1V wireless lavalier microphone for cameras. This comprehensive guide walks you through setup, usage, and troubleshooting, making professional sound accessible for beginners.
Key Takeaways
- Connect the Boya BY-M1V easily for clear voice recording.
- Understand transmitter and receiver pairing for wireless freedom.
- Optimize mic placement for best audio quality.
- Troubleshoot common issues to ensure smooth operation.
- Enhance your video content with professional sound.
Are you tired of fuzzy, distant audio ruining your camera footage? Getting professional-sounding audio for your videos can feel like a daunting task, especially when you’re just starting out. Many beginners struggle with confusing microphones and lengthy setups. But what if there was a simple, effective solution that offered wireless freedom and impressive sound quality without breaking the bank? You’re in the right place! This guide will demystify the Boya BY-M1V wireless lavalier mic for cameras, providing easy-to-follow steps to help you capture pristine audio for all your projects.
Understanding the Boya BY-M1V Wireless Lavalier Mic
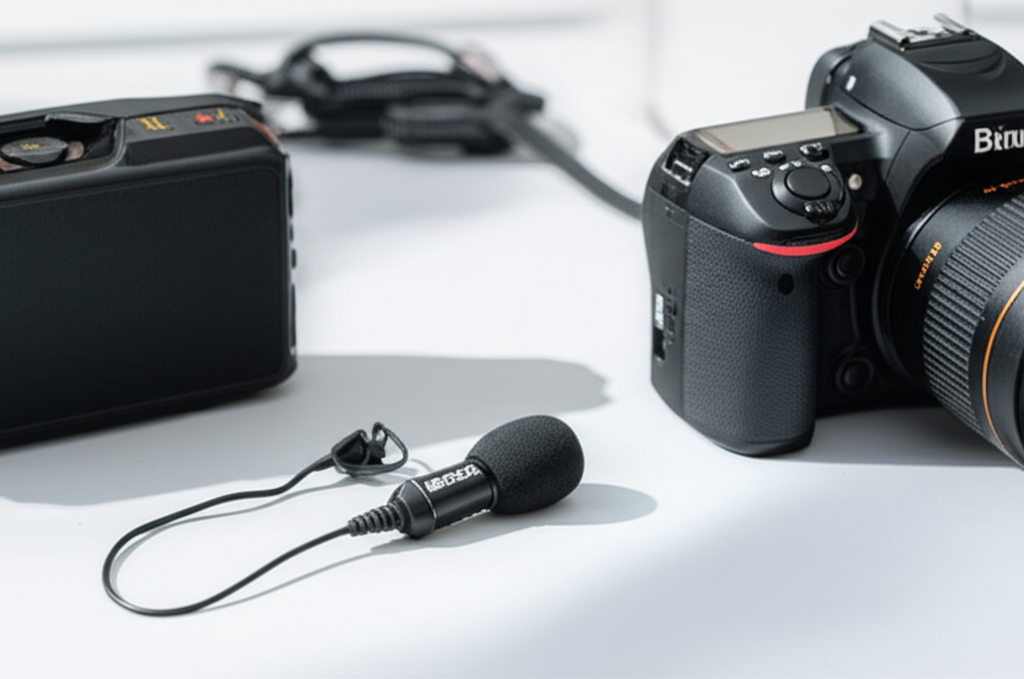
The Boya BY-M1V is a compact and versatile wireless microphone system designed to significantly improve the audio quality of your videos. It’s a popular choice for content creators, vloggers, interviewers, and educators who need a reliable and user-friendly audio solution. Unlike built-in camera microphones, which often pick up ambient noise and lack clarity, a lavalier microphone clips directly to your clothing, placing the mic close to your voice source. The “wireless” aspect means you can move freely without being tethered by an audio cable, offering much more flexibility during recording.
This system typically consists of a transmitter (which clips onto the person speaking and holds the microphone), a receiver (which connects to your camera or smartphone), and the microphone itself. The BY-M1V’s simplicity makes it an excellent entry point into wireless audio technology. Its plug-and-play nature means minimal technical hassle, allowing you to focus on what you do best – creating great content. According to industry reviews, the BY-M1V offers a commendable balance of performance and affordability, making it a top contender for budget-conscious creators.
What’s Inside the Box?
When you unbox your Boya BY-M1V, you’ll find everything you need to get started. Familiarizing yourself with these components is the first step to successful use. Here’s a typical breakdown:
| Component | Description | Function |
|---|---|---|
| Transmitter Unit (TX) | Small, lightweight unit with a clip. | Attaches to clothing; houses the microphone and sends audio wirelessly. |
| Receiver Unit (RX) | Small unit with a clip and audio output. | Connects to your camera or smartphone; receives the audio signal. |
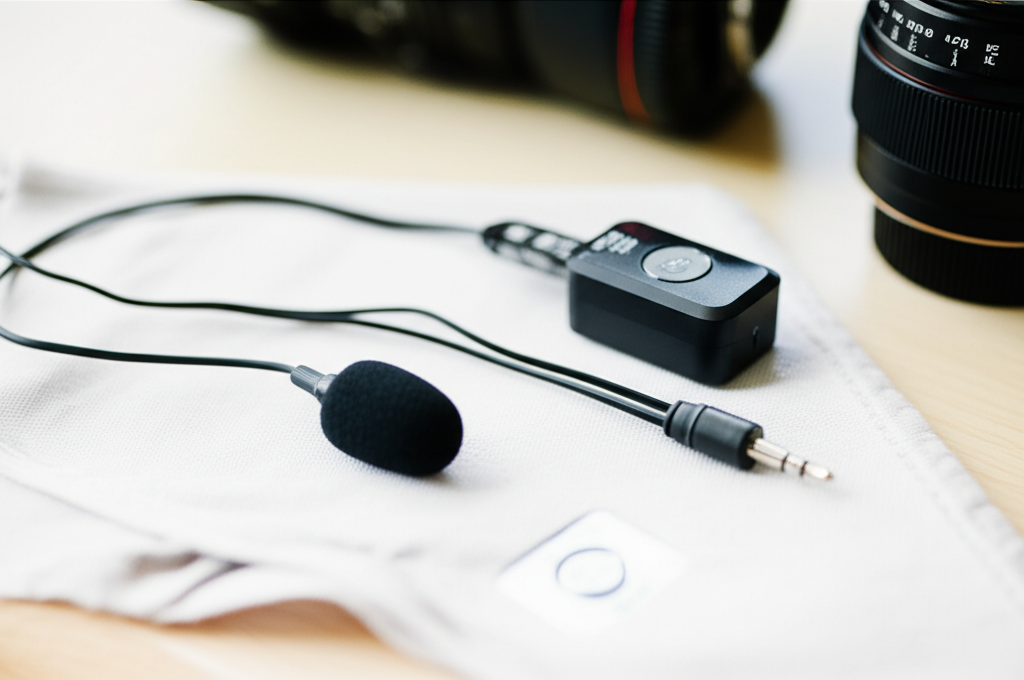
| Lavalier Microphone | A small, discreet microphone with a cable. | Captures your voice clearly and plugs into the transmitter. |
| USB-C Charging Cable | Standard charging cable. | Powers up both the transmitter and receiver. |
| 3.5mm TRS to 3.5mm TRRS Cable | Audio cable with different connector types. | Connects the receiver to cameras, DSLRs, or camcorders. |
| Carrying Pouch | Soft pouch. | Protects your microphone system during transport. |
| User Manual | Booklet with instructions. | Provides detailed setup and operational guidance. |
Having all these pieces ready ensures you won’t be caught off guard when it’s time to record. Each component plays a vital role in delivering that clear, wireless audio experience.
Step-by-Step: Setting Up Your Boya BY-M1V
Getting your Boya BY-M1V ready for action is straightforward. Follow these steps carefully, and you’ll be recording in no time.
Step 1: Charge Your Units
Before the first use, ensure both the transmitter (TX) and receiver (RX) units are fully charged. This prevents interruptions during your recording sessions. Locate the USB-C charging ports on each unit. Connect them to a power source using the provided USB-C cable. A full charge typically takes a couple of hours. Look for indicator lights to show charging status; they usually change color or turn off when charging is complete.
Pro Tip: Keep a portable power bank handy for on-the-go charging, especially if you’re shooting for extended periods away from a power outlet.
Step 2: Attach the Microphone and Transmitter
Take the lavalier microphone and plug its cable into the designated port on the transmitter (TX) unit. This port is usually clearly marked. Once plugged in securely, clip the transmitter unit onto the collar, lapel, or waistband of the person who will be speaking. Position the microphone itself so it’s about 6-8 inches (15-20 cm) below the chin. Experiment slightly to find the sweet spot that captures your voice clearly without picking up too much breath noise or plosives (popping sounds from ‘p’ and ‘b’ sounds).
Step 3: Connect the Receiver to Your Device
This is where you bridge the wireless system to your recording device. The connection method depends on what you’re using:
- For Cameras (DSLRs, Mirrorless, Camcorders): Use the included 3.5mm TRS to 3.5mm TRS cable (if your camera has a mic input). Plug one end into the audio output of the receiver (RX) unit and the other end into the dedicated microphone input on your camera. Make sure to use the correct cable; a TRS cable has two black rings on the connector, suitable for cameras.
- For Smartphones (with 3.5mm jack): Use the included 3.5mm TRS to 3.5mm TRRS cable. Plug one end into the receiver (RX) and the other into your smartphone’s headphone jack. A TRRS cable has three black rings, indicating it supports both audio input and output, which is what smartphones often require.
- For Smartphones (without 3.5mm jack, e.g., iPhone, newer Androids): You will need a separate adapter. Use an Apple Lightning to 3.5mm Headphone Jack Adapter for iPhones, or a USB-C to 3.5mm Headphone Jack Adapter for most Android devices. Connect the receiver to the adapter, and then plug the adapter into your phone.
It’s crucial to use the correct cable type. Using a TRRS cable with a camera that expects TRS can result in no audio or distorted audio. For more detailed information on audio connections for different devices, consult resources from camera manufacturers like Canon or Nikon, which often detail their audio input specifications.
Step 4: Power On and Pair
Turn on both the transmitter (TX) and the receiver (RX) units. There’s usually a power button on each. Once powered on, they should automatically attempt to pair. The indicator lights on both units will typically blink during the pairing process and then turn solid when a connection is established. If they don’t connect automatically, consult your user manual for manual pairing instructions, which might involve pressing a button on both units simultaneously.
Step 5: Configure Your Camera/Device Settings
This step is critical for ensuring your camera or device is set up to receive audio from the external microphone.
- Camera Settings: Navigate to your camera’s audio settings menu. Look for options related to audio input and select “External Microphone” or a similar setting. You might also need to adjust the audio level input. Start with a moderate level and do a test recording.
- Smartphone Settings: For smartphones, the operating system usually detects the external microphone automatically when connected via an adapter. However, some recording apps might have their own audio input settings.
Performing a test recording is highly recommended at this stage. Speak normally into the microphone and record a short clip. Play it back to check the audio quality, volume levels, and ensure there are no unwanted noises or connection dropouts.
Using Your Boya BY-M1V: Tips for Optimal Performance
Once set up, understanding how to use the Boya BY-M1V effectively will elevate your audio even further. It’s about more than just plugging it in; it’s about mindful usage.
Mic Placement is Key
As mentioned, the ideal placement for the lavalier microphone is 6-8 inches below the chin. This position captures your voice directly while minimizing the intake of mouth noises and plosives. Avoid clipping it directly onto a tie that might move, or too close to the chest, which can create a muffled sound. For windy outdoor conditions, consider using a foam windscreen or a furry “deadcat” windscreen, if available for your microphone, to reduce wind noise.
Monitoring Your Audio
Some wireless microphone systems allow for audio monitoring – listening in real-time to what the microphone is picking up. While the Boya BY-M1V receiver might not have a dedicated headphone jack for monitoring on all models, it’s good practice to have a way to check your audio. If your camera has a headphone jack, you can often monitor the audio coming from the camera itself. This allows you to catch any issues like clipping (distortion) or low volume immediately.
Understanding Signal Strength and Interference
Wireless microphones transmit audio signals through radio frequencies. Factors like distance from the transmitter to the receiver, physical obstructions (walls, bodies, furniture), and other radio signals can affect the signal strength and potentially cause dropouts or interference.
- Keep the transmitter and receiver within line of sight as much as possible.
- Avoid placing the receiver directly on top of a camera if it has metal components that could interfere with the signal. Sometimes, mounting it to the side or on a camera cage can improve reception.
- Be aware of other wireless devices operating nearby, such as Wi-Fi routers or other wireless microphones.
For reliable performance, it’s generally recommended to keep the transmitter and receiver within a reasonable range, typically specified in the manual (often around 15-20 meters or 50-65 feet in open areas for this type of system). For critical recordings, always perform range tests in your specific shooting environment.
Battery Management
Always check the battery levels of both units before you start recording. Most systems have indicator lights that show battery status. If a unit is low on battery, swap it out or begin charging. For longer shoots, having spare batteries or a power bank is essential. It’s a good habit to recharge units immediately after use so they’re ready for the next session. This proactive approach ensures your Boya BY-M1V wireless lavalier mic for cameras is always ready when inspiration strikes.
Troubleshooting Common Issues
Even with user-friendly devices, occasional hiccups can occur. Here are some common problems and their solutions for the Boya BY-M1V:
| Problem | Possible Cause | Solution |
|---|---|---|
| No Audio / Weak Audio |
|
|
| Distorted / Clipping Audio |
|
|
| Interference / Static / Buzzing |
|
|
| Receiver/Transmitter Not Powering On |
|
|
Remember to always consult your specific Boya BY-M1V user manual for detailed troubleshooting steps tailored to your model. For persistent issues, reaching out to Boya’s customer support is often the best course of action. Reputable sources like RTINGS.com also provide extensive reviews and testing methodologies for audio equipment that can help you understand common performance issues.
Boya BY-M1V vs. Other Options
The Boya BY-M1V wireless lavalier mic for cameras stands out in its category, but how does it compare to other popular choices? Understanding the landscape helps you make an informed decision.
Internal Camera Microphones
Pros: Built-in, no extra cost, always ready.
Cons: Poor audio quality, picks up camera noise, limited range, picks up ambient sounds easily.
Comparison: The BY-M1V offers a massive upgrade in clarity, noise reduction, and flexibility, making it indispensable for any serious video production.
Wired Lavalier Microphones
Pros: Simple, reliable, no batteries needed for the mic itself, often cheaper.
Cons: Limited freedom of movement due to the cable, cable can be noisy or get caught.
Comparison: While simpler, a wired mic restricts your ability to move around. The BY-M1V provides freedom, which is invaluable for dynamic shooting styles.
Other Wireless Systems (e.g., Rode Wireless GO, DJI Mic)
Pros: Often offer advanced features like higher quality codecs, longer range, built-in recording, app integration.
Cons: Significantly more expensive.
Comparison: The BY-M1V is often positioned as a budget-friendly alternative. While higher-end systems might offer superior sound fidelity or robustness, the BY-M1V delivers excellent value for beginners and intermediate users who need reliable wireless audio without a substantial investment. According to data from Statista, the global microphone market is diverse, with budget options serving a large segment of users.
The BY-M1V strikes a sweet spot for many creators by offering the essential benefits of wireless audio at an accessible price point. Its ease of use means you spend less time fiddling with tech and more time creating.
Frequently Asked Questions (FAQ)
1. Can I use the Boya BY-M1V with my iPhone or Android phone?
Yes, you can! You’ll need the correct adapter. For iPhones without a headphone jack, use the official Apple Lightning to 3.5mm adapter. For Android phones without a headphone jack, use a USB-C to 3.5mm adapter. If your phone has a headphone jack, use the included 3.5mm TRS to TRRS cable.
2. Does the Boya BY-M1V require batteries?
Yes, both the transmitter and receiver units have built-in rechargeable batteries that are charged via USB-C. They do not use disposable batteries.
3. How far can the Boya BY-M1V transmit audio?
The effective wireless range is typically up to 45-50 meters (around 150 feet) in open, obstruction-free environments. However, this can be reduced by walls, furniture, and radio interference.
4. Is the microphone omnidirectional?
Yes, the lavalier microphone included with the BY-M1V is generally omnidirectional. This means it picks up sound from all directions, making it easier to capture your voice consistently without precise positioning, but it also means it can pick up more ambient noise.
5. How do I know if the transmitter and receiver are connected?
Both units have indicator lights. When they are successfully paired and connected, the lights will typically turn solid (often blue or green, check your manual) instead of blinking. If they are blinking, they are searching for each other or not connected.
6. Can I use multiple Boya BY-M1V systems at the same time?
The standard BY-M1V system is designed for one transmitter and one receiver. While Boya offers other systems that support multiple mics, this particular model is intended for single-person use or interviewing one person at a time without additional accessories.
Conclusion: Elevate Your Videos with Clear Audio
You’ve now journeyed through the essentials of the Boya BY-M1V wireless lavalier mic for cameras. From understanding its components and performing a straightforward setup to optimizing its use and troubleshooting common issues, you’re well-equipped to significantly enhance the audio quality of your videos. Investing in a dedicated microphone like the BY-M1V is one of the most impactful upgrades you can make to your content creation toolkit, moving you beyond the limitations of built-in microphones.
Remember that clear audio is just as important as crisp visuals. It builds trust with your audience, makes your content more professional, and ensures your message is communicated effectively. With the Boya BY-M1V, you have a reliable, user-friendly, and budget-conscious tool to achieve just that. So go ahead, experiment, record with confidence, and let your voice be heard clearly!