
Learn how to clean your mirrorless camera sensor safely and effectively. This guide provides step-by-step instructions using the right tools to avoid damage and keep your images dust-free.
Key Takeaways
- Protect your camera investment by cleaning the sensor correctly.
- Gather essential sensor cleaning tools before you start.
- Prepare your camera for sensor cleaning by setting it to sensor cleaning mode.
- Use compressed air or a bulb blower for initial dust removal.
- Employ wet cleaning methods with specialized swabs and solutions for stubborn spots.
- Always check your work and re-assemble your camera carefully.
Why Cleaning Your Mirrorless Camera Sensor Matters
Have you ever noticed tiny dark spots or smudges appearing in the same place on every photo you take, no matter how clean your lens looks? This is a common sign that your camera’s sensor is dirty. For mirrorless camera owners, keeping the sensor pristine is crucial for image quality. Unlike DSLRs with their fixed mirrors, mirrorless cameras have sensors that are more exposed when you change lenses. Dust or debris on the sensor can translate directly into unwanted artifacts in your images, especially at smaller apertures (higher f-numbers).
Learning how to clean your mirrorless camera sensor safely is a skill every photographer should have. It might seem intimidating at first – you’re dealing with the heart of your camera, after all. But with the right knowledge, tools, and a bit of patience, you can perform this essential maintenance yourself. This guide will walk you through the process step-by-step, ensuring you can keep your sensor clean without risking damage, so you can continue capturing sharp, clear photos. Let’s dive into how to make sure your images are as clean as your creative vision.
Essential Tools for Safe Mirrorless Camera Sensor Cleaning
Before you even think about touching your camera’s sensor, it’s vital to have the right tools. Using the wrong items can cause scratches, leave residue, or even permanently damage your sensor. Think of this as gathering your surgical instruments before a delicate procedure. Each tool has a specific purpose, and using them correctly is key to a successful cleaning.
Here’s a breakdown of what you’ll need:
1. Air Blower (Bulb Blower)
This is your first line of defense against loose dust. A manual bulb blower (often called a rocket blower) is preferred over canned air. Canned air can spray propellant, which can leave residue or even freeze parts of your camera. A bulb blower uses only air.
2. Sensor Cleaning Swabs
These are specialized, lint-free swabs designed to fit the exact size of your camera sensor. They come in different sizes, so make sure you get the ones appropriate for your camera model (e.g., APS-C, Full-Frame). They are typically sealed in sterile packaging.
3. Optical-Grade Cleaning Solution
This is a special liquid designed specifically for cleaning camera sensors. It’s formulated to evaporate quickly without leaving streaks or residue. Never use Windex, alcohol, or other household cleaners, as they can damage the sensor’s coatings. A common type is isopropyl alcohol solution designed for optical cleaning. [Note: Ensure it’s specifically for camera sensors and has a high purity, typically 99.9% isopropyl alcohol.]
4. Lens Cleaning Cloths

While not directly for the sensor, you’ll use these high-quality microfiber cloths to clean your lenses before reattaching them and for wiping down the camera exterior.
5. Magnifying Glass (Optional but Recommended)
A small magnifying glass can help you inspect the sensor for dust and confirm that cleaning has been successful.
6. Clean Workspace
Find a dust-free environment. A clean room, a bathroom after running the shower to settle dust, or even a well-lit area away from open windows and vents is ideal.
Preparing Your Mirrorless Camera for Cleaning
Safety first! Before you start cleaning, you need to prepare your camera properly. This involves ensuring the sensor is accessible and protected, and that no accidental button presses can occur.
Step 1: Charge Your Battery
This is a critical step. Your camera needs power to access the sensor cleaning mode, which holds the shutter open. If your battery dies halfway through the cleaning process, the shutter will close, potentially damaging the swab or swab head. Ensure your battery is fully charged or use a fully charged spare.
Step 2: Find a Dust-Free Environment
As mentioned earlier, a clean workspace is paramount. Turn off fans and air conditioners, close windows, and minimize any air movement. Dust particles are tiny, and even a slight breeze can deposit new dust onto your exposed sensor.
Step 3: Remove the Lens
Carefully detach the lens from your camera body. Point the camera downwards as you do this to minimize the chance of dust falling onto the sensor. Immediately cap the lens and place the camera body face down on a clean surface.
Step 4: Activate Sensor Cleaning Mode
Most mirrorless cameras have a specific “sensor cleaning” mode in their menu. This mode physically locks the shutter open, allowing you direct access to the sensor. Consult your camera’s manual for the exact location of this setting. For example, Canon users might find it under “Setup” > “Sensor cleaning,” while Sony users may look in the “Setup” > “Maintenance” menu. Once activated, you should see an open shutter mechanism, revealing the sensor.
[External Link: A reputable camera manufacturer’s support page or manual can provide specific instructions for activating sensor cleaning mode. For instance, looking up “Nikon Z sensor cleaning mode” on their support site.]
Safely Cleaning the Mirrorless Camera Sensor: Step-by-Step
With your camera prepared and tools at the ready, it’s time for the actual cleaning. We’ll start with the least invasive method and proceed only if necessary.
Step 5: Initial Dust Removal with Air Blower
Hold the Camera Downwards: Keep the camera body facing downwards. This allows gravity to help any dislodged dust fall out of the camera rather than settling deeper.
Gentle Air Puffs: Take your bulb blower and hold it a few inches away from the sensor. Give it a few firm, short puffs of air. Do not touch the sensor with the blower tip.
Angle of Attack: Try blowing air from different angles – from the side, from the top – to dislodge any stubborn dust particles.
Visual Check: After blowing, look at the sensor. You can often see loose dust particles if you shine a light on it from an angle. If the dust is gone, congratulations! You can proceed to reassemble. If not, move to the next step.
Step 6: Wet Cleaning for Stubborn Spots
This is where sensor cleaning swabs and solution come into play. Follow these instructions precisely.
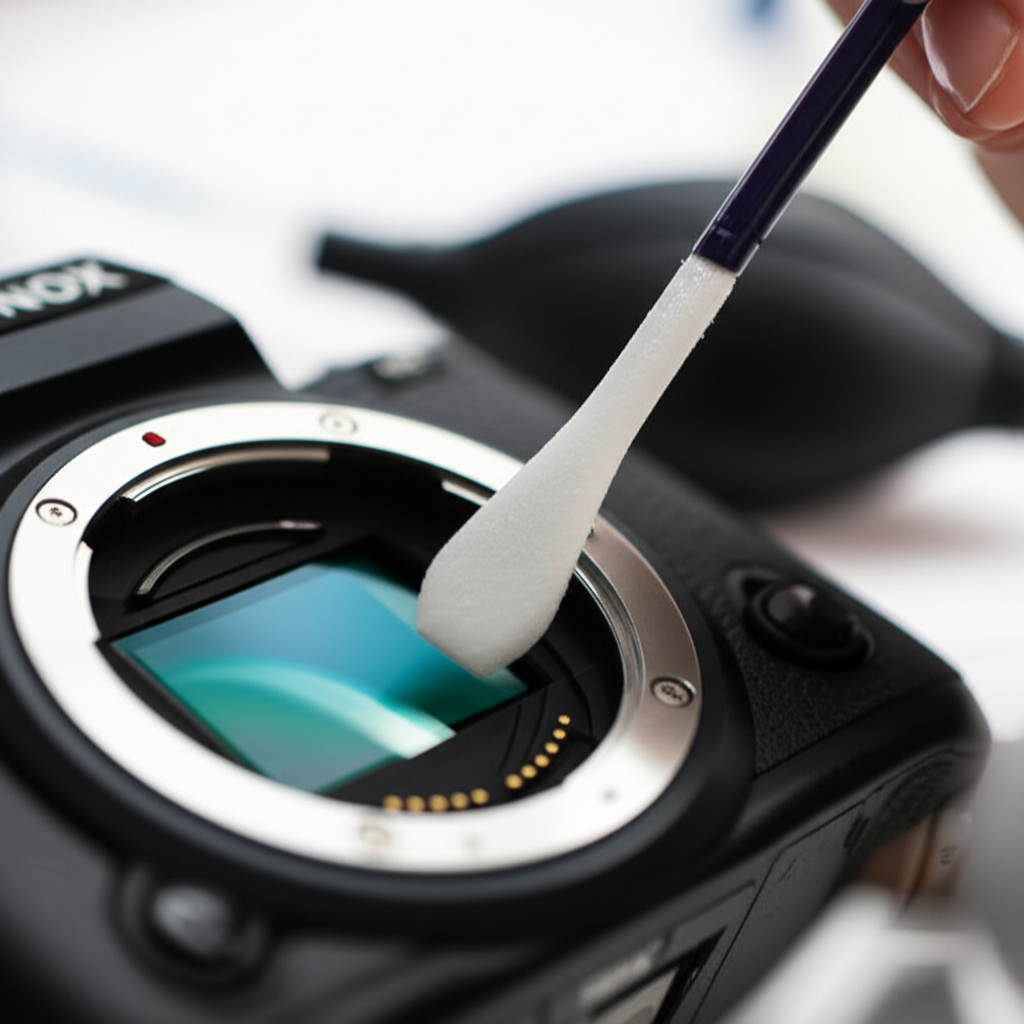
Prepare the Swab: Open a new, sterile sensor cleaning swab. Carefully apply one or two drops of the optical-grade cleaning solution onto the tip of the swab. Do not oversaturate it. The swab should be damp, not dripping.
Gentle Swipe (First Direction): With the camera still facing downward and the shutter open, place the damp swab gently on one edge of the sensor. Apply very light pressure, just enough for the swab to make contact. Swipe the swab smoothly across the entire surface of the sensor in one continuous motion.
Flip and Swipe (Second Direction): Once you reach the other side of the sensor, flip the swab over to its clean side. Now, starting from the opposite edge, swipe back across the sensor in a single, continuous motion. This second pass helps to pick up any remaining residue.
Dispose of Swab: Never reuse a sensor cleaning swab. It has picked up dust and potential debris, and reusing it could scratch your sensor. Dispose of it immediately.
Step 7: Air Dry and Inspect
Allow to Dry: Wait a few moments for the cleaning solution to evaporate completely. Most high-quality sensor cleaning solutions are designed to dry very quickly and without residue.
Visual Inspection: With a bright light and potentially a magnifying glass, carefully inspect the sensor for any remaining dust or smudges. If you see any spots you missed or new ones appear, you may need to repeat the wet cleaning process with a fresh swab. Be cautious and try not to over-clean.
Pro Tip: The “Test Shot” Method
After cleaning, don’t just put your lens back on and assume it’s clear. Take a test shot! Set your camera to Aperture Priority mode, select the smallest aperture (highest f-number, like f/16 or f/22), and point your camera at a plain, bright surface like a white wall or a clear sky. Take the photo and then zoom in on the image on your camera’s LCD screen. Any dust spots will appear as dark circles or smudges. Move the focus point around the image to check the entire frame. If you see spots, you know you need to clean again.
Reassembling Your Camera and Final Checks
Once you’re confident that your sensor is clean, it’s time to reassemble your camera.
Step 8: Close the Shutter and Reattach Lens
Exit Sensor Cleaning Mode: Go back into your camera’s menu and exit the sensor cleaning mode. This will allow the shutter to close automatically.
Attach Lens Cap: Immediately after the shutter closes, attach the rear cap to your lens to prevent further dust ingress.
Reattach Lens: Carefully attach the lens back onto your camera body.
Step 9: Final Test Shot
Take another test shot, just like in the Pro Tip above, but this time at your smallest aperture. Zoom in to ensure all dust spots are gone. If you used the wet cleaning method and notice faint streaks, you might need a very careful second pass with a fresh swab and solution, or you might have applied too much pressure or solution initially. Sometimes, very faint streaks can be removed in post-processing, but a clean sensor is always the ideal.
Understanding Different Sensor Sizes and How They Affect Cleaning
The size of your camera’s sensor plays a role in how much dust it can accumulate and how easy or difficult it is to clean. Understanding these differences can help you tailor your approach.
Your mirrorless camera likely has one of two common sensor sizes: APS-C or Full-Frame.
| Sensor Size | Physical Size (approx.) | Relative Dust Visibility | Cleaning Ease |
| :———— | :———————- | :———————– | :———————————————— |
| APS-C | 23.6mm x 15.6mm | Moderate | Easier to reach edges, smaller surface area. |
| Full-Frame| 36mm x 24mm | High | Larger surface area requires more careful passes. |
APS-C Sensors: These are smaller than full-frame sensors and are found in many entry-level to mid-range mirrorless cameras. Because they are smaller, they often feel less intimidating to clean. A single swipe with a standard-sized sensor swab usually covers the entire surface.
Full-Frame Sensors: These are the same size as a 35mm film frame and are found in professional-grade cameras. The larger surface area means you need to be extra diligent with your cleaning passes. Ensure your swab is appropriately sized for a full-frame sensor to cover it effectively in one or two passes.
The process of cleaning remains the same regardless of sensor size, but the physical area you’re covering differs. Always use swabs specifically designed for your sensor size. A swab for an APS-C sensor might not cover a full-frame sensor adequately in a single stroke, potentially leaving streaks or missed spots.
When to Seek Professional Cleaning
While most sensor cleaning can be done at home, there are times when it’s best to leave it to the experts. If you’re uncomfortable with the process, notice physical damage, or the dust is stubbornly persistent, a professional cleaning service is the safest bet.
Consider professional cleaning if:
You’ve tried cleaning multiple times with no success.
You notice scratches or physical damage on the sensor.
You’re experiencing a lot of oil spots or adhesive residue that won’t budge.
* You are simply too nervous to attempt it yourself due to the value of your camera.
Professional camera repair shops have specialized equipment and trained technicians who can clean your sensor effectively and safely. This often costs more than a DIY approach but provides peace of mind.
Frequently Asked Questions About Mirrorless Camera Sensor Cleaning
Q1: How often should I clean my mirrorless camera sensor?
A1: There’s no fixed schedule. Clean it when you notice dust spots in your photos. This might be every few weeks, months, or even longer, depending on how often you change lenses and where you shoot.
Q2: Can I use a microfiber cloth to clean my sensor?
A2: No. Microfiber cloths are great for lenses and camera bodies but are too abrasive and can leave lint on the delicate sensor surface. Always use specialized sensor cleaning swabs.
Q3: What if I see a tiny smudge even after cleaning?
A3: Wait for the sensor to dry completely. Sometimes, a faint smudge is just a trace of the cleaning solution. If it persists after drying, you might need to repeat the wet cleaning process with a fresh swab and a very light touch.
Q4: Is it safe to use canned air (compressed air) for sensor cleaning?
A4: It’s generally not recommended. Canned air can spray propellant that leaves a residue, and the high pressure can also potentially damage the sensor or internal components. A manual bulb blower is a much safer alternative. According to articles discussing camera maintenance, the risk of propellant spray is a key reason to avoid canned air.
Q5: My camera has an in-body image stabilization (IBIS) system. Does this affect sensor cleaning?
A5: Yes, when you enable sensor cleaning mode, the IBIS system is typically deactivated to prevent it from moving the sensor during cleaning. Always ensure your camera is in its designated sensor cleaning mode as per the manual.
Q6: What is the difference between dust on the sensor and dust on the lens?
A6: Dust on the lens usually appears as a soft blur or haze, especially at wider apertures. Dust on the sensor, however, appears as sharp, dark spots that remain in the same position in every photo, particularly noticeable at smaller apertures.
Q7: Can I clean the shutter curtain?
A7: No. The shutter curtain is a delicate mechanical component. Unless you are a trained professional, you should never attempt to clean the shutter curtain. Focus solely on cleaning the sensor when it’s in the sensor cleaning mode.
Conclusion: Keep Your Images Crystal Clear
Cleaning your mirrorless camera sensor might seem like a daunting task, but it’s a manageable and essential part of maintaining your camera’s performance. By understanding the risks, gathering the correct tools, and following a careful, step-by-step process, you can keep your sensor free from dust and debris. Remember to always work in a clean environment, use specialized cleaning materials, and never force anything.
Regular, safe sensor cleaning ensures that your images are sharp, clear, and free from those annoying dark spots that can detract from your creative vision. With a little practice, you’ll become confident in this vital maintenance task. So, take a deep breath, follow these guidelines, and enjoy the crisp, clean images your mirrorless camera is capable of producing. Happy shooting!