
Yes, you can often use your camera cage with a gimbal, but it depends on the specific cage and gimbal’s design. A cage adds mounting points and protection, which can be beneficial for gimbal use, but ensure it doesn’t add too much weight or bulk that hinders gimbal balance and performance.
Key Takeaways
- Adapt your camera cage for gimbal use.
- Check cage and gimbal compatibility.
- Ensure balanced weight distribution.
- Mounting accessories securely is crucial.
- Test your setup before shooting.
Can I Use My Camera Cage With A Gimbal?
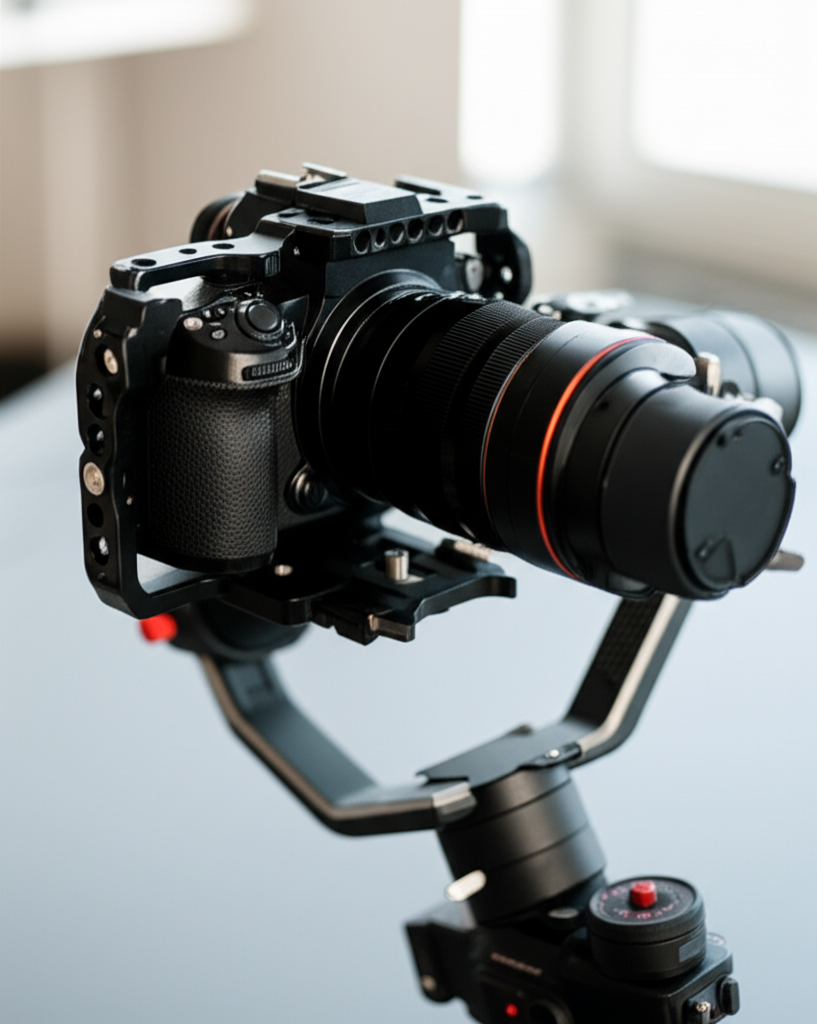
As a passionate filmmaker or content creator, you’re always looking for ways to enhance your shots and protect your valuable gear. You might have invested in a sturdy camera cage for better handling and mounting options. Now, you’re wondering if that same cage can make the leap to your smooth-moving gimbal setup. It’s a common question, and the answer is usually yes, but with a few important considerations. This guide will walk you through everything you need to know to make your camera cage and gimbal work harmoniously, ensuring you get those buttery-smooth shots without a hitch.
Understanding Camera Cages and Gimbals
Before we dive into combining them, let’s quickly recap what each piece of gear does. A camera cage is essentially a protective frame that attaches to your camera body. It provides multiple mounting points (usually 1/4-inch and 3/8-inch threads) on its sides, top, and bottom. These are perfect for attaching accessories like microphones, lights, monitors, handles, and even mounting plates. Cages also offer a more ergonomic grip and protect your camera from accidental bumps and dings.
A camera gimbal, on the other hand, is an electronic stabilizer. It uses motors and sensors to counteract your camera’s movements, keeping it incredibly steady even when you walk, run, or pan rapidly. The goal of a gimbal is to eliminate unwanted shake and vibrations, resulting in professional-looking, cinematic footage. Achieving this stabilization requires the camera to be perfectly balanced on the gimbal’s axes.
The Benefits of Using a Camera Cage with a Gimbal
Combining your camera cage with a gimbal isn’t just possible; it can be highly beneficial. Here’s why you might want to do it:
- Expanded Accessory Mounting: This is the biggest advantage. Your cage offers numerous 1/4-inch and 3/8-inch mounting points. This means you can easily attach essential accessories like a portable monitor for better framing, a wireless microphone receiver, an LED light for fill, or even a top handle for low-angle shots, all directly to the cage while it’s on the gimbal.
- Enhanced Grip and Control: Many camera cages are designed with ergonomics in mind, offering a more comfortable and secure grip than the camera body alone. This improved handling can translate to more stable movements when operating the gimbal.
- Camera Protection: Even on a gimbal, your camera is vulnerable. A cage provides an extra layer of protection against accidental drops, bumps, or knocks, which can be a lifesaver, especially when you’re out in the field.
- Streamlined Workflow: By having your accessories pre-mounted to the cage, you can quickly attach and detach the entire setup from the gimbal. This saves significant time when you’re setting up or packing down your gear.
Potential Challenges and How to Overcome Them
While the benefits are clear, there are some potential downsides to using a cage with a gimbal. Understanding these will help you avoid common pitfalls:
1. Increased Weight and Size
The Challenge: Camera cages, especially those with many mounting options, can add significant weight and bulk to your camera setup. Gimbals have a maximum payload capacity – the total weight they can effectively stabilize. Adding a heavy cage with multiple accessories can push your setup over this limit.
The Solution:
- Check Payload Capacity: Always refer to your gimbal manufacturer’s specifications for its maximum payload capacity. Then, weigh your camera, lens, cage, battery, and any accessories you plan to mount. Ensure the total weight is well within the gimbal’s limit. For example, DJI’s RS 3 Pro has a payload capacity of 10 lbs (4.5 kg), while a smaller gimbal like the Zhiyun Crane M3 might only handle around 2.6 lbs (1.2 kg).
- Choose a Lightweight Cage: Opt for cages made from lighter materials like aluminum alloy or carbon fiber, rather than heavier steel. Many cages are also designed with cut-outs to reduce weight without compromising structural integrity.
- Be Selective with Accessories: While the cage offers many mounting points, you don’t need to use them all. Only attach essential accessories for your current shoot.
2. Balancing Issues
The Challenge: Gimbals require precise balancing to function correctly. The motors need to be counteracted by the weight distribution of the camera and its accessories. A cage can alter the camera’s center of gravity, making it more difficult to achieve perfect balance.
The Solution:
- Re-balance Every Time: When you add or remove accessories from your cage, the balance of your camera on the gimbal will change. You’ll need to re-balance the gimbal’s pitch, roll, and yaw axes for optimal performance.
- Use the Cage’s Mounting Points Strategically: If your cage has multiple mounting points for a handle or accessories, experiment with their placement. Sometimes shifting an accessory a few centimeters can drastically improve the balance.
- Consider Gimbal-Specific Cages: Some cage manufacturers design cages specifically for use with gimbals. These often feature a streamlined profile and integrated mounting solutions that are optimized for gimbal balancing.
3. Interference with Gimbal Movements
The Challenge: A bulky cage or accessories attached to it might physically collide with the gimbal’s motors or arms during extreme pans or tilts. This can cause jerky movements, cut off shots, or even damage your equipment.
The Solution:
- Test Full Range of Motion: Before you start recording, carefully move the gimbal through its full range of motion in all three axes (pan, tilt, roll). Check for any contact points between the cage, accessories, and the gimbal itself.
- Position Accessories Carefully: Mount accessories in locations on the cage that provide the most clearance from the gimbal arms. Often, mounting accessories to the sides or the very top of the cage, away from the tilting axis, works best.
- Use Smaller, Compact Accessories: If possible, opt for smaller or more compact versions of accessories. For instance, a small on-camera light might be better than a large panel light.
Step-by-Step Guide: Attaching Your Caged Camera to a Gimbal
Ready to combine your gear? Follow these steps for a smooth setup:
Step 1: Prepare Your Camera and Cage
First, attach your camera to the cage. Ensure it’s securely fastened using the cage’s mounting screws. If your camera requires a separate battery pack or plate to mount to the cage, install that now.
Step 2: Mount Essential Accessories
Attach any crucial accessories you’ll need for your shoot to the cage. This could include a microphone, a small monitor, or a handle. Double-check that each accessory is firmly secured.
Step 3: Attach the Quick-Release Plate
Most gimbals come with a quick-release (QR) plate system. You’ll need to attach one of these plates to the bottom of your camera cage. Look for the standard 1/4-inch or 3/8-inch screw threads on the bottom of your cage and match them with the appropriate screw on the QR plate. Tighten it securely.
Step 4: Mount the Camera Assembly to the Gimbal
Now, carefully lift your camera-and-cage assembly and slide the QR plate onto the gimbal’s mounting bracket. Secure it using the gimbal’s quick-release lever or locking screws. Ensure it’s locked in place firmly.
Step 5: Power Up and Balance
Turn on your gimbal and then your camera. Follow your gimbal’s specific balancing procedure. This typically involves adjusting the camera’s horizontal and vertical position on the gimbal arms, as well as tilting and panning the camera until it stays put when you gently release it. This is the most critical step for smooth footage.
Pro Tip: Many modern gimbals have a built-in calibration or auto-tuning function. Use this after you’ve achieved a rough balance. It helps the motors learn the weight and inertia of your setup for optimal stabilization.
Step 6: Test and Calibrate
Once balanced, gently move the gimbal through its full range of motion while the camera is off. Check for any collisions. Then, turn the camera back on and perform a test recording. Move around slowly and deliberately, panning, tilting, and walking. Review the footage to ensure stabilization is working correctly and there are no unexpected jitters or issues.
Camera Cage vs. Gimbal-Specific Cages
Not all camera cages are created equal when it comes to gimbal use. Some are designed as general-purpose cages, while others are optimized for gimbal integration:
| Feature | Standard Camera Cage | Gimbal-Specific Cage |
|---|---|---|
| Weight & Size | Can be heavier and bulkier, potentially impacting payload. | Often designed to be lighter and more compact, with fewer excess parts. |
| Mounting Points | Abundant, offering maximum accessory options. | Strategically placed for gimbal clearance and essential accessories. |
| Balance Optimization | May require more effort and strategic accessory placement for balance. | Often includes built-in features or designs that aid in achieving balance faster. |
| Clearance | Risk of accessories colliding with gimbal arms if not carefully placed. | Designed with gimbal arm clearance in mind to prevent collisions. |
| Price | Varies widely, but general cages can be more affordable initially. | Can sometimes be more expensive due to specialized design. |
When choosing a cage for gimbal use, consider looking for terms like “gimbal-friendly,” “lightweight,” or “compact design.” Brands like SmallRig, Ulanzi, and Tilta offer a range of cages, some specifically tailored for popular gimbal models.
Accessorizing Your Caged Camera on a Gimbal
The beauty of a cage on a gimbal is the ability to add more than just the camera. Here are some popular accessories and how to mount them:
- Microphones: Mount a shotgun microphone or wireless receiver to the top or side of the cage. This keeps your audio clean and away from your hands.
- External Monitors: A small, lightweight field monitor can be invaluable for critical focus and framing. Attach it to a cold shoe mount on the cage or to a 1/4-inch thread with an articulating arm for optimal positioning.
- LED Lights: For low-light situations or to add a bit of fill, a small LED panel can be mounted on a cold shoe or thread. Be mindful of its weight and how it affects balance.
- Top Handles: For low-angle shots or easier carrying, a top handle can be attached to the cage. Ensure it doesn’t obstruct the gimbal’s movement.
- Power Banks: Some cages have integrated solutions or mounting points for small power banks to extend camera or accessory battery life. Place these thoughtfully to avoid unbalancing the gimbal.
When Not to Use a Camera Cage with a Gimbal
There are a few scenarios where using a camera cage with a gimbal might not be the best idea:
- Extremely Lightweight Setups: If you’re using a very small, light camera (like a compact mirrorless or smartphone) on a correspondingly small gimbal, adding a cage might be overkill and negatively impact the payload and performance.
- Budget Constraints: If you’re on a tight budget, investing in a cage might be secondary to getting a good lens or better lighting. You can often get by with basic gimbal setup without a cage for simpler shots.
- Minimalist Shoots: For quick interviews or simple walk-and-talks where only the camera is needed, the added setup time and weight of a cage might not be worth it.
- Gimbal Payload is Maxed Out: If your camera, lens, and essential accessories already push your gimbal close to its maximum payload, adding a cage is likely not feasible.
Maintaining Your Setup
Keeping your caged camera and gimbal in top condition involves a few regular checks:
- Check Screws and Mounts: Regularly ensure all screws and mounting points on your cage and gimbal are tight. Vibrations can loosen them over time.
- Clean Lenses and Sensors: Just like any camera setup, keep your lens clean for sharp footage. You might also need to clean the gimbal sensors if you notice performance issues.
- Battery Management: Ensure all batteries (camera, gimbal, accessories) are fully charged before heading out.
- Firmware Updates: Keep your gimbal’s firmware updated. Manufacturers often release updates that improve stabilization performance and add new features. You can usually find these updates on the manufacturer’s website (e.g., DJI, Zhiyun, or Moza).
Frequently Asked Questions (FAQ)
Q1: Will a camera cage affect my gimbal’s autofocus?
A1: Generally, no. The camera cage itself doesn’t directly interfere with your camera’s autofocus system. However, if you attach accessories that block your camera’s autofocus sensors or light, it could potentially impact AF performance. Ensure accessories are mounted to provide clear paths for your camera’s AF system.
Q2: How much extra weight can a cage add?
A2: This varies greatly depending on the cage’s material and design. A minimalist aluminum cage might add 100-200 grams, while a more robust cage with integrated handles and plates could add 300-500 grams or more. Always check the cage’s specifications and weigh your total setup.
Q3: Can I use a camera cage if my camera has a battery grip attached?
A3: Some cages are designed to accommodate battery grips, while others are not. You’ll need to check the cage’s specifications or look for models that specifically mention compatibility with cameras using battery grips. If not, you might have to choose between the cage and the battery grip.
Q4: What are the signs my gimbal is unbalanced due to the cage?
A4: Signs of an unbalanced gimbal include motors running constantly at high speed, jerky movements when panning or tilting, audible motor strain, reduced battery life, or the camera slowly drifting when you let go of it. If you notice these, re-balancing is essential.
Q5: Do I need a special quick-release plate for a camera cage?
A5: Typically, no. Most camera cages have standard 1/4-inch or 3/8-inch mounting threads on the bottom. You use the standard quick-release plate that came with your gimbal and screw it into the appropriate thread on your camera cage. Some specialized cages might offer integrated quick-release systems, but this is less common.
Q6: Is it worth buying a cage specifically for gimbal use?
A6: If you frequently use your camera on a gimbal and need to mount accessories, a gimbal-specific cage can be very beneficial. They are designed to streamline the process, reduce weight, and improve balance and clearance, saving you time and frustration. However, if your needs are simple or your budget is tight, a standard cage or even no cage might suffice.
Conclusion
So, can you use your camera cage with a gimbal? The answer is a resounding yes, provided you approach it thoughtfully. A camera cage can significantly enhance your gimbal setup by offering versatile accessory mounting, improved ergonomics, and crucial protection. However, it’s vital to be mindful of the added weight, potential balancing challenges, and the risk of interference with gimbal movements.
By understanding your gimbal’s payload capacity, choosing a suitable cage, carefully mounting your accessories, and diligently balancing your setup, you can unlock the full potential of your gear. The ability to add essential tools like monitors and microphones directly to your caged camera while maintaining fluid, stabilized shots opens up a world of creative possibilities. Take the time to test, calibrate, and refine your setup, and you’ll be well on your way to capturing stunning, professional-quality footage with your camera cage and gimbal working in perfect synergy.